The Ultimate Guide to Uploading Crystal-Clear Videos to Instagram and TikTok

Ever uploaded a video to Instagram or TikTok, only to have it look blurry, pixelated, and downright unprofessional? You’re not alone. Many creators struggle with their content looking fantastic in their editing software but losing all its crisp quality once it hits the platform. The good news is that achieving high-quality, clear, and sharp uploads is simpler than you think. This guide will walk you through the exact, proven steps—from export to upload—to ensure your videos always look their absolute best.
The Foundation: Exporting in Maximum Quality
The journey to a perfect upload begins long before you open the Instagram or TikTok app. It starts in your editing software. The cardinal rule is to always export your video in the highest possible quality from your computer.
Whether you use Adobe Premiere Pro, Final Cut Pro, DaVinci Resolve, or another desktop editor, the principle is the same. For this example, let’s look at Adobe Premiere Pro. Once your edit is complete, navigate to File > Export > Media.

Here, you’ll want to select a custom preset that guarantees a 4K export. Specifically, choose the High Quality 4K 2160p option. While some default settings might be sufficient, manually selecting this preset ensures there’s no ambiguity. After choosing this, click the “Match Source” button to confirm all settings align with your original high-quality sequence. From personal experience, skipping this explicit 4K export step often leads to terrible quality on social platforms. Once configured, export the file to a location like your desktop.
The Critical Transfer: Getting the File to Your Phone Without Losing Quality
You have a pristine 4K video file on your computer. Now, you must get it onto your phone without degrading it. This is a crucial step many creators get wrong.
Do not text the video to yourself or send it via email. These methods use heavy compression that will “absolutely tank” the video quality. Instead, use one of these lossless transfer methods:
- Google Drive: Upload the video file to a Google Drive folder from your computer, then open the Drive app on your phone and download it directly.
- iCloud Drive/Link: Use iCloud Drive or generate a shareable iCloud link to send to your device.
- AirDrop (Recommended): For Apple users, this is often the fastest and most reliable method. Simply right-click the video file on your Mac, select Share > AirDrop, and send it to your iPhone. Ensure you select the “Best Quality” option if prompted.

This step ensures the video file on your phone is identical in quality to the one you exported from your computer.
Instagram Upload Protocol: The Hidden Settings and Tricks
Now that your high-quality video is on your phone, it’s time to tackle the upload process, starting with Instagram. The platform has specific settings that are often overlooked.
First, you must enable a crucial option in the Instagram app. Go to your profile, tap the three-line menu (☰) in the top right, then go to Settings > Account > Data Usage.
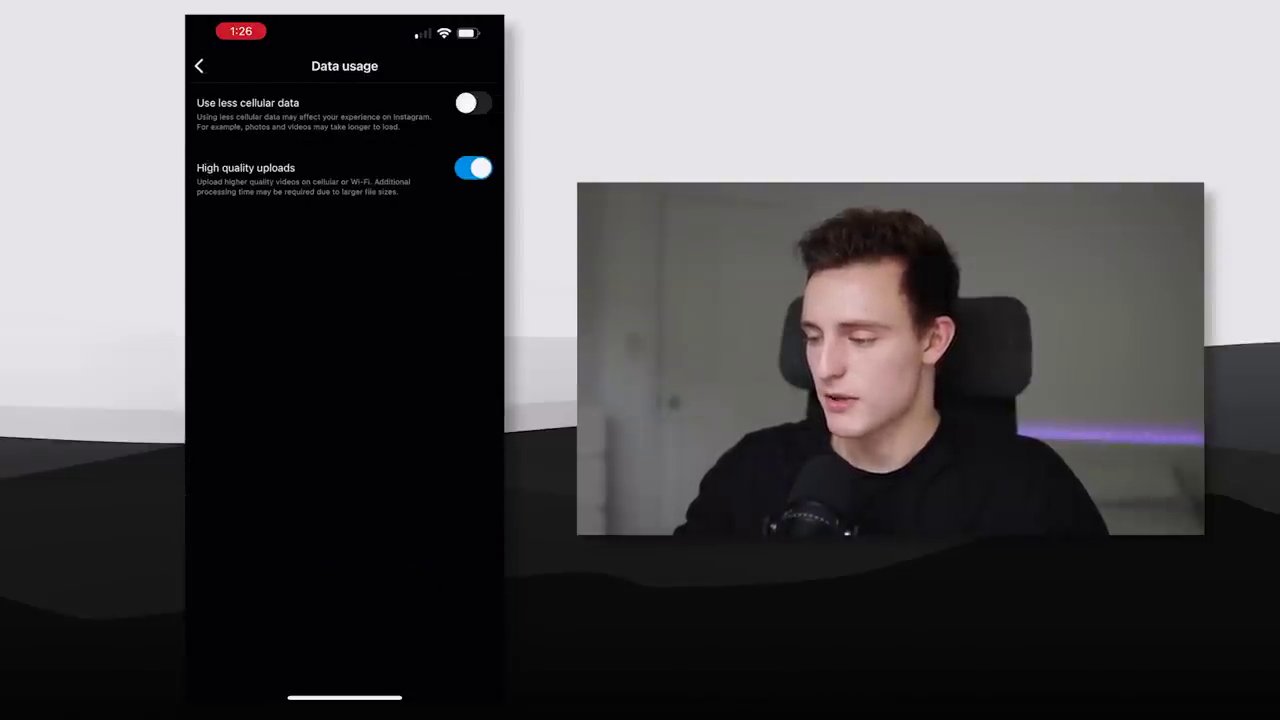
You will see two toggles:
1. High Quality Uploads: This is likely turned off by default. Turn it ON. This setting tells Instagram to upload higher quality videos over both cellular and Wi-Fi.
2. Use Less Cellular Data: This is usually turned on by default. Turn it OFF to prevent any data-saving compression.
With these settings configured, you’re ready to upload. Tap the ‘+’ button and select ‘Reel,’ then choose your video from your gallery. Here comes a vital, lesser-known trick:
Let the video preview play through in its entirety before tapping ‘Add.’ Do not skip ahead. While the app shows a preview, it seems to be processing the file. Allowing it to play through completely before proceeding has proven, through hundreds of uploads, to result in consistently better quality.
After it finishes playing, tap ‘Add,’ proceed to the next screens to write your caption, edit the cover, and publish. You may notice a temporary fuzzy preview on the following screen—this is normal and does not reflect the final uploaded quality.
TikTok Upload Protocol: Finding the Quality Toggle
TikTok’s process is slightly more straightforward, as the key setting is found during the upload itself, not in a separate menu.
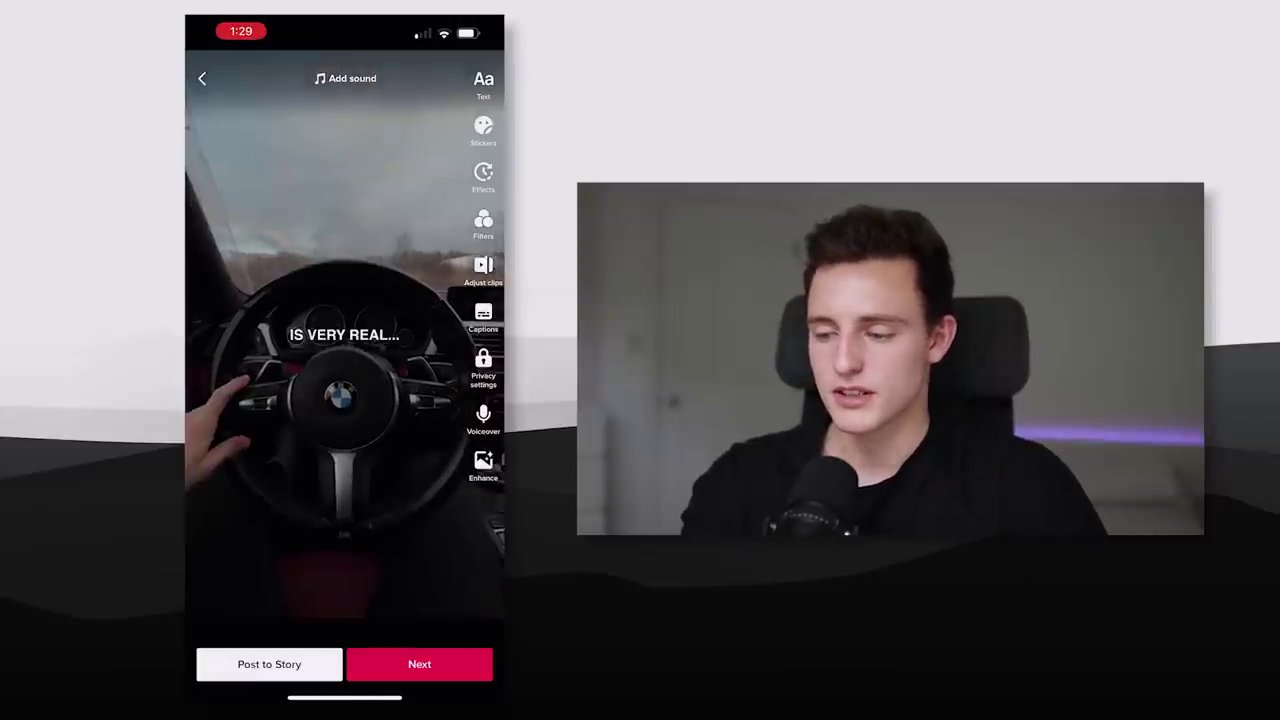
Open TikTok, tap the ‘+’ button to create, and select your high-quality video. Similar to Instagram, let the video preview play through completely on the editing screen before hitting ‘Next.’ Also, by default, TikTok often applies an “Enhanced” filter. It’s recommended to turn this off for a more natural, true-to-source look.
Once you click ‘Next,’ you’ll be on the final posting screen. Before you press ‘Post,’ you must enable the high-quality option. Tap ‘More options’ and look for the setting ‘Allow high quality uploads.’ Make sure this is checked ON.
With this box ticked, you can complete your caption, tags, and cover, then post your video. This simple toggle is the final gatekeeper to ensuring your crisp export makes it onto the platform intact.
Troubleshooting and Final Checklist
Both Instagram and TikTok can be “glitchy.” If you follow all steps and still experience poor quality, try the process again. Sometimes, it takes a couple of attempts for the platforms to properly process the high-resolution file.
Here is your complete, step-by-step checklist for guaranteed high-quality uploads:
- Export in 4K: From your desktop editor (Premiere Pro, Final Cut, etc.), explicitly select a High Quality 4K 2160p preset.
- Transfer Losslessly: Use AirDrop, Google Drive, or iCloud—never email or text.
- For Instagram:
- Enable High Quality Uploads in Settings > Account > Data Usage.
- Disable Use Less Cellular Data.
- In the Reel uploader, let the video preview play fully before tapping ‘Add.’
- For TikTok:
- In the uploader, let the video preview play fully.
- Turn off the “Enhanced” filter.
- Before posting, go to More Options and enable Allow high quality uploads.
Mastering the technical side of content creation is just as important as the creative side. By following this precise workflow, you take full control of how your audience sees your work, ensuring it’s always sharp, clear, and professional. For more insights on working with social media content, explore our guide on the hidden signals that shape digital platforms. Remember, consistency in quality helps with audience retention and growth. Now that you know how to preserve your video quality, you might also be interested in learning how to download Instagram Reels and videos for your own creative projects or inspiration. Go ahead—export, transfer, toggle, and upload. Your crisp, high-quality content awaits.